


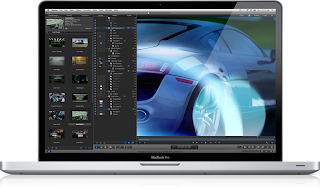
With its intuitive interface, Motion lets you immediately combine video
and graphics, animate text, or create dazzling particle effects. But don’t
confuse efficient design with simplicity. Motion is a deep application
that can help realize your creative vision, no matter how intricate or
complex.
In this first lesson, we won’t focus on what things are or why they work.
You’ll learn more details in the lessons that follow. In this lesson, you’ll
jump right in and start building a new project to quickly get a feel for
what’s unique about Motion and why it’s so much fun.

Following a New Paradigm
With Motion, you can do things on a desktop or portable computer that were unthinkable
only a few years ago: create compelling, professional-looking motion graphics and visual
effects in a real-time design environment.
Whether you answer to a producer, agency, corporate client, or to your own creative muse,
you can design motion graphics in a way that is natural and addictive.
Motion makes it easy to perform the primary motion graphics tasks: compositing and
animating. Compositing involves layering together disparate elements to create a single
complete image. Animating involves changing properties of those elements over time so
that they fly, drift, grow, fade, spin, or wriggle. The interactive, real-time design engine
and unique behaviors of Motion allow you to design and animate elements as your project
plays.
With its intuitive 3D design tools, you can spread out your elements in 3D space; add
lights, reflections, and shadows; and fly virtual cameras around a 3D world.
Finally, you can use all of these features in Smart Templates that can be published to and
modified in Final Cut Pro X.
Whether you’re designing an opening title sequence, producing a series of lower thirds,
or doing green screen work, Motion makes motion graphics and visual effects more
accessible, more interactive, and more enjoyable.
Before you get started, install the Motion application, if necessary, and copy the lessons
and media from the book’s DVD to your hard disk. Instructions for doing this are in
the Getting Started section of this book. After those two tasks are complete, let’s start by
opening Motion and creating a new project.
1 From the Dock, click the Motion icon to open the application.
The first window that opens is the Project Browser, where you can create a new project,
open a recent project, or choose a template. In this exercise, you’ll create a new project.
The sidebar to the left of the Project Browser lists project categories and themes. The
center project stack displays thumbnail previews of projects based on the sidebar
selection. An information column to the right includes project settings options.

2 Verify that the Blank category is selected in the sidebar, that Motion Project is selected
in the project stack and that the Broadcast HD 720 Preset is selected in the
information column.
Tip To see the projects you’ve recently worked on, from the sidebar list, select
In this lesson, you’ll work with a video clip recorded in 1280 x 720 HD resolution
at 59.94 frames per second (fps). Because these are the default project settings, you
needn’t change the Broadcast HD 720 Preset in the information column.
Tip You usually choose a project Preset setting based on the format of your video
material and the target output specifications. For example, you might choose one preset
to create a spot for standard-definition television and a different preset for HDTV
content. If you consistently create projects using the same preset, you can choose to
bypass the Project Browser by changing an option in the Project pane of the Motion
Preferences.
3 Click Open.
A new, empty Motion project opens.
Importing a Video Clip
The Motion interface, called the workspace, consists of a single window with components
you can show or hide. The large upper-right area dominated by a black rectangle is the
Canvas. Here you build and view your project. To the left of the Canvas is the Project
pane, which displays all the elements in your project.
panes: the File Browser, Library, and Inspector. Along the bottom of the workspace, you’ll
find the Timing pane, which contains the Timeline, the Audio Timeline, and the Keyframe
Editor. Finally, above the Timing pane is the toolbar, which contains tools and controls for
creating and editing project elements.

first way you’ll create a layer is by bringing a video clip into your project.
include graphics, video, and audio files that are located on your computer or connected
storage devices.
1 In the middle of the File Browser, click the Desktop icon. This section of the File
Browser is called the sidebar.
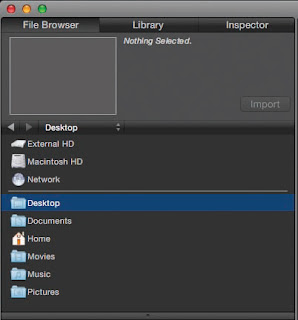
The contents on your desktop are now displayed in the lower section of the File
Browser, called the stack.
2 Double-click the Motion5_Book_Files folder.
3 Double-click the Media folder, and then double-click the Skier folder, which contains
a single video clip, mogul_1.

4 Select the clip and look at the top of the File Browser.

In this preview area, you can preview a video clip and also find important information
about the clip, including its resolution, codec, and frame rate.
Because this is the clip you want to use, you can add it to your project by simply dragging
it into the Canvas or clicking the Import button.
5 Drag the clip from the File Browser stack (not from the preview area) to the Canvas
but don’t release the mouse button just yet.

the Canvas. You’ll see the clip snap to those lines as it approaches them. These lines,
called dynamic guides, help you center an element in the Canvas and align multiple
elements.
6 Snap the clip to the center of the Canvas and release the mouse button.
Congratulations. You’ve now created your first Layer in Motion.
NOTE P If the dynamic guides don’t appear, turn on snapping by choosing View >
Snap, or pressing N.
Before you go any further, it’s a good idea to save your project.
7 Choose File > Save, or press Command-S.
8 Navigate to Desktop > Motion5_Book_Files > Lessons > Lesson_01 > Student_Saves.
TIP The lower half of the Save dialog includes a menu for Collect Media. When
set to Copy to Folder, Motion copies all the external video, audio, and graphics used
in the project into the same folder as the saved project, making it easy to back up your
project or move it to another Mac.
When you added the clip to the project, you may have noticed that a translucent gray
window appeared in the center of the workspace. It’s called the heads-up display, or HUD,
and you’ll use it later in this lesson. For now, you can turn it on and off by clicking the
HUD button on the right side of the toolbar or by pressing F7.


0 comments:
Post a Comment