Top 10 Productivity Applications of 2011

Top 10 Productivity Applications of 2011

motion 5: Getting Around in Motion

motion 5: Getting Around in Motion

Target your Audience by Designing

Target your Audience by Designing

WDD wishes you a very Happy New Year!

WDD wishes you a very Happy New Year!

Your Home Page Never Being Changed


Your Home Page Nevr Being Changed

Some websites illegally modify your registry editor and set their website as default home page, for stop this,

1. Right-click on the Internet Explorer icon on your desktop and select "Properties".

2. In the "Target" box you will see "C:\Program Files\Internet

Explorer\IEXPLORE.EXE".

3. Now by adding the URL of the site to the end of this it overrides any
Homepage setting in internet options:

"C:\Program Files\Internet Explorer\IEXPLORE.EXE" www.orkut.com


(same holds true for firefox and other browsers as well)
This makes orkut as your default home page in internet explorer and this also overrides any home page setting in internet options and your home page will be secure.

Your Own Home Server - Introduction


An Introduction

In this tutorial you will learn how to step up your own server. This server will be comprised of Apache 1.3.5, PHP 4.2.0, and MySQL 3.23.49. This tutorial will address the basic setup of a server on your own computer. This means the removal of hassles of dealing with the company that is running a remote web server. It will be easy to modify. You can add any thing you want to it, be it CGI/Perl, Zope, Roxen, etc, all by your self. You will have unlimited disk space, well at least as big as your hard drive is =) Now that you know the advantages, it is time that I tell you what i used, and what you will need.

What I used
* Windows 2000 - NOTE that if you are using 2k you WILL NEED Administrative Privileges. If you don't then get them somehow =) If you are on 95, 98, NT, XP, ME, I
* Apache 1.3.6 - I tried to use 2.0 but I could not get it work. I also feel that 1.3.6 is tried and true, so why mess with greatness.
* Mysql 3.23.49 - The newest version of MySQL when I set up my server. MySQL also the is the best PHP supported Database, and well love PHP don't we.
* PHP 4.2.1 - The latest and greatest PHP release. -nt

What you will need
* Apache 2 - Link: h**p://www.apache.org/dist/
* Mysql 3.23.49 - Link: h**p://www.mysql.com/downloads/mysql-3.23.html
* PHP 4.2.0 - Link: h**p://www.php.net/downloads.php
* Windows - This tutorial is ONLY written for new versions of Windows.

Once you have downloaded all the programs you are ready to continue.

1. Installing Apache

Installing Apache

The first step is to download Apache for Windows. Before you install it make sure that any other server software is removed. Remove it all via the control panel.On

Once you have clicked on the executable, a screen should com up that looks like this. Go ahead and click on next

user posted image

Of course you plan to abide be the license agreement, so click on I accept.... and click on next.

user posted image

You really don't need to read this, but if you want you can. Read it if you want feel informed. When you are ready click on next.

user posted image

Here is where the actual setup of Apache begins. For Network Domain put in localhost as for Server Name You want these both to be localhost because the server is running locally, on your computer. It doesn't matter what is in email field, just put in yours. No one will no it because it's just you.

user posted image

For the sake of this tutorial it is better to just leave it as it is because, later in the tutorial I will show you how to start the server with one click of the mouse, and for the sake of ease, it will be easier for you to follow along. You can change it if you want, but you will have to realize where to substitute it. For me the root drive is E: but for you will probably be C:

user posted image

Once you have all the jazz set up, it is time to install the server. If you are on w2k or XP be sure that you have Administrative permissions or you will get an error about half way through the install saving cannot access msvrt32.dll or something. If you get that error run it again when you have admin privileges. Once you are ready click on install.

user posted image

If all went well you just see a screen similar to this. Now it is time to test the install of apache. Click on Start > Program Files > Apache HTTP Server and look for start Start Apache in Console. Click it. Once it says Apache XXXXX running, press Windows Key + R and type -http://localhost/. If the install works you should see a page saying that it works. If all is set and done, continue to the next step.

user posted image
______________________________________________________________________
2. Installing PHP
Once you have clicked on the executable, a screen should come up that looks like this. Go ahead and click on next.

user posted image

Of course you plan to abide be the license agreement, so click on I accept.... and click on next.

user posted image

For this information, we will want the simple standard install. Chances are you if you are reading this tutorial, you will probably not even want to talk about advanced =)

user posted image

This is the mail setup, just enter localhost, and me@localhost.com. These are not important, because you, the admin, are the only person that will use the server, and you will be the one handling errors.

user posted image

We are going to want this install to work is Apache, so click on Apache, and move on.

user posted image

Once you have all the jazz set up, it is time to install the server. If you are on w2k or XP be sure that you have Administrative permission or you will get an error about half way through the install saving cannot access msvrt32.dll or something. If you get that error run it again when you have admin privileges. Once you are ready click on install.

user posted image

After the install is done you should get something that says you will have to manually configure apache to use php. Assuming you have a working Apache server installed, make sure that it is not running. Navigate to C:\Program Files\Apache Group\Apache\conf\ open the httpd.conf file. Note that you can also get to the http.conf from the start menu. Start > Program File > Apache HTTP Server > Configure Apache Server > Edit the Apache httpd.conf Configuration File and the window will open up in notepad. Now hit Ctrl + End if you see something like what follows, you can skip this step. If you do not see that code, copy it. This code will only work if you used the default install folder when you installed php. If you did, copy that code and paste it into the end of the file. Select the code to right, and hit crtl + c , then go into the httpd.conf file and hit ctrl + v and save the file.

ScriptAlias /php/ "c:/php/"

AddType application/x-httpd-php .php .phtml

Action application/x-httpd-php "/php/php.exe"

Now that we have php installed, it is time to test it. Open up notepad and type the code to the right. Save it as phpinfo.php. Remember to set it as all files in the drop down menu, or the file will be a text file. Save in the Directory: C:\Program Files\Apache Group\Apache\htdocs. htdocs is the directory where all the files go. You can create endless dir's and browse them. For Example E:\Program Files\Apache Group\Apache\htdocs\mydir\myfile.php could be accessed as http://localhost/mydir/myfile.php. Once you have that file saved. You will need to start the Server. Click: Start > Program File > Apache HTTP Server >; and look for something like Start Apache in Console. After you have found it, launch it. You should get a window saying that Apache is running. Now go to Start > Run > and type in -http://localhost/phpinfo.php. If you don't see anything, php is not installed correctly. If php is installed correctly, you will see a few large tables, displaying php's configuration. Now Your are 1/2 done!
______________________________________________________________________
3. Installing MySQL
Once you have clicked on the executable, a screen should com up that looks like this. Go ahead and click on next.

user posted image

Of course you plan to abide be the license agreement, so click on I accept.... and click on next.

Just like before you should leave the default dir alone, so you will be able to follow along with me when I show you how to start and stop all the aspects of the server.

Stay with the typical installation. Just like before, if you don't have admin privileges, the install will be faulty. After you click next, the install will begin. After the install has finished, move on to the next step.

Now you have to set up the root account. The root account is the absolute admin of the system, the highest possible. Click on Start > Run and type cmd to open up the command prompt. You are going to have to navigate to where MySQL is installed. Type C: > Enter > cd mysql > Enter > cd bin > Enter. Now you have to tell setup the root settings. Type mysqladmin -uroot password InsertYourPasswordHere then hit enter.

To see an image of the screen, -h**p://www.webmasterstop.com/tutorials/images/doscreen1.gif

What is the point of having a database if you can't easily administer it! That is where phpMyAdmin comes into play. phpMyAdmin is a free piece of software written in php that makes the administration of a mysql or many other types of databases easy. You will want to download (h**p://prdownloads.sourceforge.net/phpmyadmin/phpMyAdmin-2.2.6-php.zip?downloadrelease_id=85832)the latest version. Save it in the htdocs folder. Once it is done downloading it, right click on it and select Extract > To Here. When it is done you should end up with a directory in the htdocs folder called phpMyAdmin-2.2.6 To make it easier to access, rename it to phpMyAdmin. After you have renamed it, click on it and look for a file called config.inc Open it. This is where you set the configuration of phpMyAdmin. When you open it up, it should look similar to the image to your side. On yours there should be a few things missing. The $cfgPmaAbsoulteUrl and $cfgservers[$i]['password']. You will need to fill those in between the quotes. for the $cfgPmaAbsoulteUrl enter -http://localhost/phpMyAdmin/ if you followed my instructions to the letter. If you did not rename it or extracted to a different directory, put that in there. For the $cfgservers[$i]['password'] enter the password you entered when you were setting MySQL in the set above. You can refer to the image for help. After you have put the right things in save the file.

To see an image of the screen, -h**p://www.webmasterstop.com/tutorials/images/phpmyadminscreen1.gif

Now we want to test the install of mysql, php, phpmyadmin, and apache all at once. Start apache in console like we did before. Now, you are going to need to start mysql. For myself I made a file that would start mysql for me. Open notepad and type: start c:\mysql\bin\mysqld-nt.exe --standalone and save that as Start MySQL.bat. Once you have saved it, click it. A window should open and then close. Mysql is now running on your computer. After mysql and apache are started go to run again and type -http://localhost/phpMyAdmin/index.php and if everything is installed correctly phpmyadmin should so up. You are almost done! Now we have the easy part =)

4. Finishing it all up

Wow! We mad it through the whole process. Now we want to simplify the whole process of controlling the server. I made a toolbar with all the things I needed. I made a new folder on my desktop and called it Server Folder and put all the stuff there. I made a new shortcut and gave it a value of -http://localhost/ made a shortcut to the PHP Documentation page. Another shortcut to my php editor, which is now unavailable. The phpMyAdmin shortcut is set to -http://localhost/phpMyAdmin/index.php. I made another shortcut htdocs. I moved the Start Apache in Console program that was in the start menu folder and moved it to the server folder. You can take the Start Mysql file you made in the last page and move it to the new folder. After you have put all the desired things into that folder, right click on a blank space in stat menu task bar (where the program boxes lie) and select Toolbars > New Toolbar and navigate to the folder. Voila!

Now all you have to do is click Start Apache in Console , Start Mysql, and Lauch browser biggrin.gif

Here You Are Guys

How To Fix The Blogger Post Paragraph With CSS Justify


Cinder Cone, Kapoho Eruption, HawaiiAfter align justify
Cinder Cone, Kapoho Eruption, HawaiiBefore align justify


Although blogging has been widely known since ever, many features on the pages are still unknown. Bloggers often ask questions about how to customize the appearance of many features inside their Blogger templates (Blogspot templates). There are many custom Blogger templates available to download to change or enhance the appearance of the pages instantly. However, simple CSS styling tricks and tips can also bring good customization to some features on the blog. A little learning of CSS can enrich your skills and beautify the appearance of the blogs. Therefore, before you decide to download the ready-to-use templates, it is good to try customizing the existing ones.

The tutorial provided below is only a part of a series of articles discussing about tricks to customize Blogger templates using CSS styling. The explanations are provided as comprehensive as possible allowing beginners and newbie to understand the simple steps. Keep on reading to know some good and easy procedures to enhance the appearance of your Blogger templates.

Justifying Blogger Posts (Blogspot Posts) Using CSS

The default settings only allow you to choose one from two text alignments, which are left and right. Either way, your texts will be aligned to one side while the other side is ragged. Actually, it is easy to change this to justified alignment. CSS styling section of the Blogger template brings the options to add another line to the text. It is the secret to create justified alignment to the Blogger templates.

There is also another way to change this alignment setting. As shown in MS word and many other word processing programs, justified alignment means that the text will be stretched from the center. Therefore, each of the edges of the text (left and right) will be in a straight line from up to bottom. Such appearance is common in newspapers and magazines. Although it sounds like a real simple feature and option, you can see that there will be huge differences in the overall designs of the page. Smart Bloggers aware of this feature and most of them choose to make a justified alignment for better Blogspot posts. The following explanations will list systematic procedures to create a justified alignment to the Blogspot templates.


  1. Before you begin any customization, please make sure that the text is not already in justified alignment. The following procedures can only be done if the text is left aligned. If it is already in justified alignment, you will not need to follow the next steps
  2. Make sure you are logged in
  3. From the Dashboard, click the Layout link for your blog and choose Edit HTML
  4. In order to avoid any mistake, please back up your template by downloading it in a full
  5. Press CTRL + F to find a code block beginning with .post in the CSS styling section of Blogger template. Most code blocks are made in typical format. Although there is a great diversity in templates, the code blocks are mostly the same. Example:

.post {
margin:.5em 0 1.5em;
border-bottom:1px dotted $bordercolor;
padding-bottom:1.5em;
}


  1. Add the following line and it will turn like this:
.post {
margin:.5em 0 1.5em;
border-bottom:1px dotted $bordercolor;
padding-bottom:1.5em;
text-align:justify;
}

  1. Click on Save Template
  2. Click View Blog to see the alignment of all your posts has now changed to justified
Tips and Troubleshooting

If the Blogger template is already aligned in justified order, you can also change/align it left. Repeat the above procedures, find the code block and modify it. Add the following code:

text-align:left;

The new code block will be:
.post {
margin:.5em 0 1.5em;
border-bottom:1px dotted $bordercolor;
padding-bottom:1.5em;
text-align:left;
}
Anytime you need to make it right-aligned, simply replaces the word ‘left’ with ‘right’.

The entire steps provided above only take approximately a minute. They are easy, simple and useful to enhance the appearance of your blog.

FROM THE BRIDGE TO PHOTOSHOP: THE ADOBE RAW CONVERTER


         Before we jump into the new and improved Raw Converter, we should spend
a little more time looking at the files (photos) that your camera creates. Digital
photographers are faced with a seemingly endless array of choices on their
cameras. Many of these options are worth exploring to enhance image quality, but a
great many only affect shooting convenience. Following are several features that
will affect how you work with your file in the Raw Converter. Other choices, such
as exposure, metering modes, Auto Focus, and Drive Mode, are critical to the making
of fine photographs, but the following represents aspects of the file that are relevant
to the processing of the image. Of course, this is just a partial list of features and
options, but they are the ones most photographers think about every time they pick
up the camera.

         • ISO
         • File Format
         • White Balance
     • Picture Styles or Camera Settings


ISO
         ISO (International Standards Organization) is a rating that refers to how sensitive
the sensor is to light. ISO 100 is considered to be slow, whereas ISO 1600 is considered
to be fast. A slow ISO setting means your sensor is not really sensitive to light,
so it needs a lot of light to form an image. This means you need either a slower shutter
speed such as 1/30 or 1/60, or a larger aperture such as f4 or 5.6. When your sensor
is really sensitive (ISO 1600), you can use faster shutter speeds (1/250, 1/500) or
smaller apertures (f16, f22) to create the image.


         So why not just put it on 1600 all of the time? One word: quality. The higher the
ISO, the more likely you are to experience noise in your photographs. Noise is the
digital equivalent of film grain just not as pretty. A sensor really only has one sensitivity.
If your camera’s lowest ISO is 100, then that is your real sensitivity. If 200 is
the lowest, than that is your actual sensitivity. To enable a higher ISO or sensitivity
to light, the camera must pass more power through the sensor. This extra power creates
noise in the resulting file. At best, noise can look like small specks of grain; at
worst, it takes on the appearance of an undesirable pattern. As you will see later in
the chapter, the Raw Converter can help reduce noise in your photographs, but it
will come at a cost.

         Depending on your camera model, noise can begin to appear even at ISO as low
as 400. To see where you begin to get noise on your camera, simply take the same
shot with all of the different ISOs that your camera provides, and examine them in
Photoshop at the view setting of Actual Pixels. You will quickly see which ISO setting
causes noise.

         File Format and Bit Depth
         When it comes to choosing a file format for your camera, JPEG and Raw are your
primary choices (see Chapter 1 for more information).

         Let’s review the differences.
         • The JPEG format will compress your file so that more images can fit onto a
memory card. On most cameras, there are different degrees of compression that
deliver various degrees of quality. The highest quality JPEG setting will produce
exceptional images due to the fact that there is a minimal amount of compression
taking place. The camera is just “saving” the file in this format. It is using
the same resolution as the Raw setting, assuring maximum image quality.

         • The Raw format on the other hand, applies no compression to your image. It simply
takes the data off of your sensor and sends it to the card unprocessed and uncompressed
(sort of . . . there is a little compression, but nothing to worry about).
         
         • JPEGs are processed faster in the camera, so you can shoot faster. Raw images
take longer to shoot and process.

         • JPEGs are immediately ready to use in other applications. Raw images must be
“post processed” first.
My recommendation is for photographers to shoot using the Raw format. If,
however, you have a camera that does not support this format, the good news is
that Adobe has upgraded the Raw Converter in CS3 to accommodate JPEGs as well!
This means that JPEGs now have access to the same streamlined image-processing
software that Raw images use, The Adobe Raw Converter.


White Balance
         With your digital camera, white balance is the equivalent of filtering for different
light sources or choosing a designated film to match the light source. For example, if
you use a daylight-balanced film (the most common type of film) under tungsten
light (a typical light bulb), your image will have a heavy orange cast. This is because
tungsten bulbs give off an orange/yellow light. To correct for this, you would buy
tungsten film to shoot in this situation. This would produce an image with a neutral
color cast. You could also put on a Tungsten Filter to correct for the orange light. This
filter would be blue.

         In digital cameras (and in the Raw Converter), the white balance setting can do
all of this for you. You merely have to change the setting. When you are shooting
under tungsten lights, you choose the tungsten setting. If you find yourself shooting
under fluorescent lighting, choose the fluorescent setting. It’s easy as pie. In the past,
it was recommended that when shooting JPEG you should set your white balance
on your camera rather than in Photoshop. This is still a good idea. However, now
that that you can open any file into the Raw Converter, you may find it easier to set
the white balance in the Raw Converter rather than at the time of shooting.
Some common white balance settings found on both digital cameras and as presets
in the Adobe Raw Converter are Daylight, Auto, Cloudy, Shade, Tungsten,
Flash, Fluorescent, Kelvin and Custom.
Auto white balance will try to balance the scene for you. This works for average
types of indoor photography. There are better ways of achieving a good white
balance, so reserve the use of this setting for when you are unsure of the light


         source, for example, when using indoor lighting. Is it tungsten, halogen, or a mix of
lighting? If you are unsure, simply set your camera on Auto White Balance Mode.
Chances are good that you will end up with very good results.

         Daylight will give you good results under . . . well . . . daylight conditions. It
will also give proper results during sunsets, sunrises, and night scenes. In any situations
where you would use daylight film, this setting will be appropriate.

         Flash is designed to give you good color when you are using the on camera
flash. It adds in a little yellow/orange to combat the overly blue light of the flash.
Consider using the cloudy setting instead of this one, however, to add more warmth.

         Cloudy will also add orange/yellow to your picture. Typically, the added orange
cast is a little heavier than that of the flash setting. Cloudy days usually produce a
significant blue cast.

         Open Shade adds even more orange/yellow than cloudy. The light found in
open shade is very blue.

         Tungsten adds a strong blue cast to overcome the heavy orange coloration of
tungsten light sources.

         Fluorescent will add a slight magenta color to balance the overall green cast of
this light source.

         Kelvin is a setting found on higher-end cameras and can drastically change the
color balance of your image. The higher end of this setting (8000) will add a lot of
warmth, while the lower end (2000) will significantly cool down your image with a
lot of blue. The Daylight White Balance setting on a camera is considered neutral. It
usually falls within the 5200–5500k range. The Kelvin setting on the camera is
mainly designed for people using a handheld color meter. Try experimenting with it
to learn more about the color and temperature of light.


         Custom is the most accurate of all of the settings. You can use this setting to
produce a very exact neutral cast in any lighting situation. Think of the other settings
as close but not quite perfect. All light sources are slightly different, and it
would be impossible to create a “preset” for all of them. To use this setting, you must
first take a picture of a gray or white card in the light source you want to shoot. The
camera will then balance the card back to neutral and store this setting. You then
choose Custom from your white balance option and it will revert back to the stored
setting. Anytime you are under a light source other than daylight, you should use
this setting. Look to your camera manual for exact directions on how to use the

         Picture Styles and Camera Settings
Another great feature of the digital camera and the Raw Converter is that it can reproduce
the look of many film types! In the Raw Converter, just moving a few sliders can
change the feel of your photograph. When working with film cameras, if we wanted to
take a portrait, we would choose a film with low saturation and low contrast. This film
would have a neutral or warm color cast to it. For general shooting, landscapes or architecture,
you could use a film that produced higher contrast and deep color saturation.

         With digital cameras, instead of buying different films for each situation, we can
simply set the camera to mimic the type of film we want to use. By applying a picture
style such as Portrait or Landscape, the camera will change its settings such as
saturation and contrast to fit with the image you want to create. With most cameras,
you can even go in and adjust these settings yourself. With the Raw Converter, you
also have control over the look of your image. Simple sliders allow you to remove or
add contrast, brightness, or color saturation.

         Let’s take a look at the way a digital camera creates an image.
         The sensor will capture the image information. At this point, the image data is
raw, meaning it has not been changed at all. It then sends this raw information on
to the camera’s processor. In the processor, it will undergo changes, which are dictated
by the way you set your camera. These settings could include File Format,
JPEG Compression Setting, Color, Contrast, and Saturation. If you had your camera
set to shoot a picture style such as Landscape or Portrait, your camera will also apply
the individual settings that these styles represent.

         It is in this stage that your camera keeps your file as Raw or changes it to a JPEG.
When shooting in JPEG, any settings that you have set on your camera such as contrast
or color tone will be permanently applied to the image. The processor will take
these settings, apply them to the Raw image information, and then turn this information
into a JPEG file.

         If you are shooting Raw, these settings get recorded as a set of instructions or directions
on how the image should appear when it is opened. They are not permanently
applied. These directions can always be changed to suit your needs without
any degradation to your file whatsoever. You can always return to the default settings
as well. After these settings are applied, the processor sends the information to
the compact flash card for storage.

         The long and short of the situation is this: If you are shooting in JPEG it is more
important to adjust these settings before shooting. When shooting in Raw, these adjustments
can be set in the Raw Converter afterwards.


         16-Bit Images

         So why is it more important to make adjustments in the camera for JPEGs? Bit
depth. Bit depth describes the amount of shades or tones a pixel can contain. An 8-bit
image contains 256 shades of gray in each channel, whereas Photoshop’s 16-bit
image contains approximately 32,768 shades in each channel. The reason it’s 32,000
and not 65,000 is that technically Photoshop uses only 15-bit color, but for the sake
of clarity, we will call it 16-bit from here on. The result of more shades of gray in
each channel is smoother gradations in the images, which results in reduced posterization
and banding (a harsh, unnatural transition in color) in viewed and, even
more noticeably, in printed images.

         To take advantage of the denser 16-bit features, the images must be captured in 16-
bit color. Taking an 8-bit image in Photoshop and choosing Image > Mode > 16
bits/Channel does not magically convert an 8-bit image to 16-bit. Photoshop cannot
add color information that was not captured. Cameras that support the Raw format are capable of shooting images in high bit depth such as 10-, 12-, or 14-bit. Once they
arrive in Photoshop, they automatically convert to 16-bit. This conversion does not in
any way degrade your image. So, again for simplicity, we can consider that our cameras
capture an image in high bit depth. This is important because this high bit depth is excellent
for making adjustments and corrections to the images. The extra data helps the
image maintain integrity while adjusting it. An 8-bit image can become posterized very
quickly, whereas a 16-bit image is much more robust because of the extra image data.

         Figure 2.1 shows a histogram of an image that is in need of a typical adjustment
to increase contrast.
Cinder Cone, Kapoho Eruption, HawaiiFIGURE 2.1 A typical histogram.


         Figure 2.2a shows an 8-bit histogram after the adjustment, and Figure 2.2b
shows the 16-bit histogram after the adjustment. Notice the gaps in the 8-bit histogram?
These gaps indicate that there is no image data available. The result would
be posterization or a very harsh transition of color gradient in the image. Histograms
and image correction are covered in more detail in Chapter 4, “Tonal Corection and
Enhancement.”

         The disadvantage of a 16-bit image is file size. A 16-bit image’s file size is double
that of an 8-bit image. After you begin to modify the image and add layers, the file
size can grow very quickly. If you have a fast computer with a lot of RAM and plenty
of storage, you may decide to keep the images in 16-bit. If you are working with limited
computing resources, a good practice is to perform the image corrections, such

Cinder Cone, Kapoho Eruption, HawaiiFIGURE 2.2A The adjustment with 8-bit
reveals gapping.
Cinder Cone, Kapoho Eruption, Hawaii
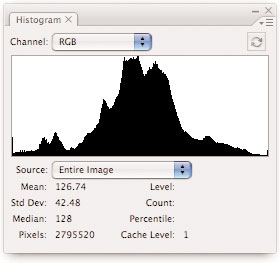
FIGURE 2.2B The adjustment with 16-bit
exhibits no gapping.


.
as ast
________


         as tonal adjustments and color correction, in the Raw Converter and then when you
open the image into Photoshop, convert to 8-bit. Directions for this will be covered
later in next post.